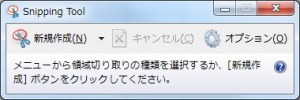
SnippingTool ってなんだろう? と思う方も多いのかもしれませんが、「Microsoft 拡張パック for Windows XP Tablet PC Edition」やStarter と Home Basic を除くエディションの Windows Vista と Windows 7 に標準で含まれている、指定した画面上の部分的な範囲のスクリーンショットを切り取るツールです。
こんなツール。通常はスタートメニューの「アクセサリ」直下にあります。

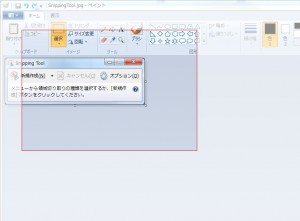
このツールを実行してみるとわかるのですが、以下のような感じで簡単にスクリーンショットをとることができます。
マウスで切り取りたい範囲をドラッグすると赤枠で囲まれた範囲が透過します。

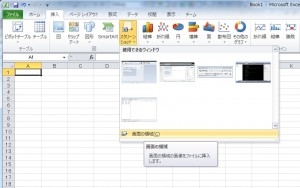
これと同様の機能が Excel 2010 にもあります。
この機能には大変お世話になっています。

で、これらのツールを使っていて矩形の中を透過させるにはどうすればいいのかをふと考えて、だいぶ前にサンプルとしてコードを組んでみたものです。
WPF を使うことで、ものすごく簡単にこのようなことができることがわかると思います。
まずは表示側となる Xaml です。
<Window x:Class="TrimScreen.MainWindow"
        xmlns="http://schemas.microsoft.com/winfx/2006/xaml/presentation"
        xmlns:x="http://schemas.microsoft.com/winfx/2006/xaml"
        WindowStyle="None" Topmost="True"
        Margin="0" Padding="0" AllowsTransparency="True"
        Background="Transparent" ShowInTaskbar="False" Title="MainWindow"
        Loaded="Window_Loaded">
    <Canvas Name="LayoutRoot" Background="Transparent" Margin="0">
        <Path Stroke="Black" StrokeThickness="1" Fill="#BBFFFFFF"
              Margin="0"
              MouseLeftButtonDown="DrawingPath_MouseLeftButtonDown"
              MouseLeftButtonUp="DrawingPath_MouseLeftButtonUp"
              MouseMove="DrawingPath_MouseMove">
            <Path.Data>
                <CombinedGeometry x:Name="ScreenArea" GeometryCombineMode="Xor" />
            </Path.Data>
        </Path>
    </Canvas>
</Window>
見てもらうとわかるように、Canvas 上に Path を配置して CombinedGeometry で Xor を指定しています。
つまり、Xor を使うと重なり合った部分を切り取ることができるため、矩形の中を透明に表示することができます。
続いてはソースコードです。
using System;
using System.Reflection;
using System.Windows;
using System.Windows.Input;
using System.Windows.Media;
using System.Windows.Shapes;

namespace TrimScreen
{
    /// <summary>
    /// MainWindow.xaml の相互作用ロジック
    /// </summary>
    public partial class MainWindow : Window
    {
        private Point _position;
        private bool _trimEnable = false;

        public MainWindow()
        {
            InitializeComponent();
        }

        private void Window_Loaded( object sender, RoutedEventArgs e )
        {
            // プライマリスクリーンサイズの取得
            var screen = System.Windows.Forms.Screen.PrimaryScreen;

            // ウィンドウサイズの設定
            this.Left = screen.Bounds.Left;
            this.Top = screen.Bounds.Top;
            this.Width = screen.Bounds.Width;
            this.Height = screen.Bounds.Height;

            // ジオメトリサイズの設定
            this.ScreenArea.Geometry1 = new RectangleGeometry( new Rect( 0, 0, screen.Bounds.Width, screen.Bounds.Height ) );
        }

        private void DrawingPath_MouseLeftButtonDown( object sender, MouseButtonEventArgs e )
        {
            var path = sender as Path;
            if( path == null )
                return;

            // 開始座標を取得
            var point = e.GetPosition( path );
            _position = point;

            // マウスキャプチャの設定
            _trimEnable = true;
            this.Cursor = Cursors.Cross;
            path.CaptureMouse();
        }

        private void DrawingPath_MouseLeftButtonUp( object sender, MouseButtonEventArgs e )
        {
            var path = sender as Path;
            if( path == null )
                return;

            // 現在座標を取得
            var point = e.GetPosition( path );

            // マウスキャプチャの終了
            _trimEnable = false;
            this.Cursor = Cursors.Arrow;
            path.ReleaseMouseCapture();

            // 画面キャプチャ
            CaptureScreen( point );

            // アプリケーションの終了
            this.Close();
        }

        private void DrawingPath_MouseMove( object sender, MouseEventArgs e )
        {
            if( !_trimEnable )
                return;

            var path = sender as Path;
            if( path == null )
                return;

            // 現在座標を取得
            var point = e.GetPosition( path );

            // キャプチャ領域枠の描画
            DrawStroke( point );
        }

        private void DrawStroke( Point point )
        {
            // 矩形の描画
            var x = _position.X < point.X ? _position.X : point.X;
            var y = _position.Y < point.Y ? _position.Y : point.Y;
            var width = Math.Abs( point.X - _position.X );
            var height = Math.Abs( point.Y - _position.Y );
            this.ScreenArea.Geometry2 = new RectangleGeometry( new Rect( x, y, width, height ) );
        }

        private void CaptureScreen( Point point )
        {
            // 座標変換
            var start = PointToScreen( _position );
            var end = PointToScreen( point );

            // キャプチャエリアの取得
            var x = start.X < end.X ? (int)start.X : (int)end.X;
            var y = start.Y < end.Y ? (int)start.Y : (int)end.Y;
            var width = (int)Math.Abs( end.X - start.X );
            var height = (int)Math.Abs( end.Y - start.Y );
            if( width == 0 || height == 0 )
                return;

            // スクリーンイメージの取得
            using( var bmp = new System.Drawing.Bitmap( width, height, System.Drawing.Imaging.PixelFormat.Format24bppRgb ) )
            using( var graph = System.Drawing.Graphics.FromImage( bmp ) ) {
                // 画面をコピーする
                graph.CopyFromScreen( new System.Drawing.Point( x, y ), new System.Drawing.Point(), bmp.Size );

                // イメージの保存
                string folder = System.IO.Path.GetDirectoryName( Assembly.GetExecutingAssembly().Location );
                bmp.Save( System.IO.Path.ChangeExtension( System.IO.Path.Combine( folder, "image" ), "png" ), System.Drawing.Imaging.ImageFormat.Png );
            }
        }
    }
}
一応、画面をキャプチャするところまで実装したためコード量が多いように見えますが、矩形を切り抜く処理は数行程度です。
また、キャプチャ処理は本題ではないので簡単な方法で済ませていますので悪しからず…
キャプチャした画像は実行ファイルがある場所に作成されます。
なんの役に立つのかはよくわからないサンプルですが、WPF をつかうと WindowForms の時にはものすごい量のコードを書く必要があったものが、ほんの数行でかけることがわかると思います。
コメントを残す
コメントを投稿するにはログインしてください。