昨年末からずっと、SharePoint 2007 から SharePoint 2010 への移行作業に追われ、開発にいたころ以来久しぶりの忙しさでした・・・(まだ作業は終わっていませんけど)
うちの会社はIT系企業ではないので、そもそも SharePoint で必要とされるソフトウェア関連の知識を持った人が乏しい為、Office InfoPath のフォームの作成から、データベースの構築、データアクセス用 web サービスの作成、サーバーファーム構成を含めたネットワーク構成の構築、IISサーバー設定と、ほぼすべての作業を1人でする羽目に・・・
外部に出せば数百万円する作業をこなしているわたしに、会社はボーナスを出せばいいと思います!!
とまあ、わたしの愚痴は置いといて(今回の記事は書くことがあまりなかったので・・・)、
SharePoint でウンウンと頭を悩ませているとき、別の調べものの最中に偶然見つけたサンプルコードに、いままでずっと頭を悩ませていた文字の縁取りに使える手法を見つけました!
(むしろ、なぜ気づかなかった? というレベルの内容です・・・)
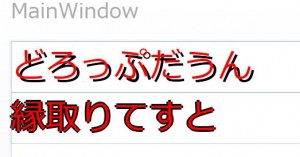
ともあれ、サンプルで書いたコードを実行するとこんな感じになります

↑正しくはドロップシャドウです・・・ もちろんワザとですよ?
考え方は、単純に同じサイズの TextBlock を4方向に少しずつずらして重ね合わせているだけです
画像などに文字を表示する際には見やすくなると思います
以下はサンプルコード
SyntaxHighlighter がもう少し見やすく Xaml コードを表示してくれるといいのですが・・・
<StackPanel Orientation="Vertical">
    <Grid>
        <TextBlock Text="{Binding ElementName=test1, Path=Text}" Foreground="Black" FontSize="{Binding ElementName=test1, Path=FontSize}">
            <TextBlock.RenderTransform>
                <TranslateTransform X="2" Y="2" />
            </TextBlock.RenderTransform>
        </TextBlock>
        <TextBlock Name="test1" Text="どろっぷだうん" Foreground="Red" FontSize="20" />
    </Grid>
    <Grid>
        <TextBlock Text="{Binding ElementName=test2, Path=Text}" Foreground="Black" FontSize="{Binding ElementName=test2, Path=FontSize}">
            <TextBlock.RenderTransform>
                <transformgroup>
                    <TranslateTransform X="0" Y="1" />
                </transformgroup>
            </TextBlock.RenderTransform>
        </TextBlock>
        <TextBlock Text="{Binding ElementName=test2, Path=Text}" Foreground="Black" FontSize="{Binding ElementName=test2, Path=FontSize}">
            <TextBlock.RenderTransform>
                <TranslateTransform X="0" Y="-1" />
            </TextBlock.RenderTransform>
        </TextBlock>
        <TextBlock Text="{Binding ElementName=test2, Path=Text}" Foreground="Black" FontSize="{Binding ElementName=test2, Path=FontSize}">
            <TextBlock.RenderTransform>
                <TranslateTransform X="1" Y="0" />
            </TextBlock.RenderTransform>
        </TextBlock>
        <TextBlock Text="{Binding ElementName=test2, Path=Text}" Foreground="Black" FontSize="{Binding ElementName=test2, Path=FontSize}">
            <TextBlock.RenderTransform>
                <TranslateTransform X="-1" Y="0" />
            </TextBlock.RenderTransform>
        </TextBlock>
        <TextBlock Name="test2" Text="縁取りてすと" Foreground="Red" FontSize="20" />
    </Grid>
</StackPanel>
こちらで紹介している文字の縁取り方法ですが、より綺麗な方法を紹介していますので、そちらも参考にしてください
コメントを残す
コメントを投稿するにはログインしてください。